
Linux Live USB Creator (LiLi) is a Boot CD product from linuxliveusb.com, get 5 Stars Rating in many reviews , Linux Live USB Creator is a free program for Windows that allows you to create a bootable Live USB key with a Linux on it.
This program also offers an exclusive option of automatic virtualization to directly run Linux in Windows without any configuration nor installation.
1. create bootable Live USB of Ubuntu, Fedora, Debian, Damn Small Linux, Puppy Linux and many others !
2. enable persistency of your data
3. launch Linux directly in Windows with a special Portable VirtualBox
4. hide created files on the key
Anybody can use Linux Live USB Creator. It's really easy-to-use and you don't have to be a computer geek !
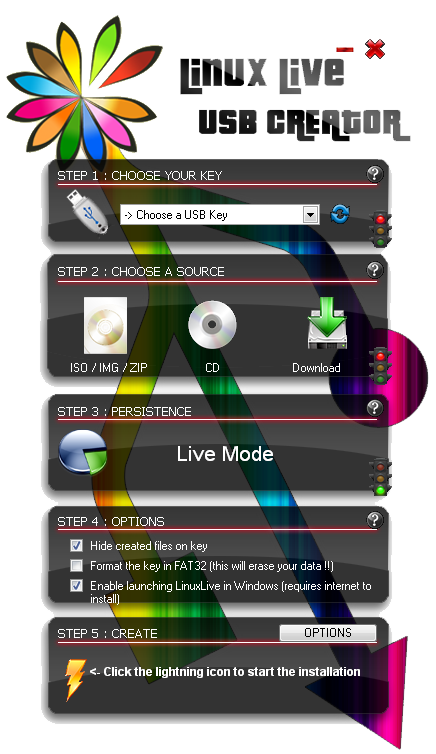
Creating a LinuxLive key is a five easy steps process :
step 1 : launch the LiLi USB Creator and choose a USB key or drive in the list
step 2 : select a ISO file or CD
step 3 : choose the size of persistency data (usually more than 250MB)
step 4 : check the options you want
step 5 : click the lightning button to start the creation
Your Live USB is ready to Boot Now Enjoy...
Features
Free and Open-source
LiLi is a completely free and open-source software for Windows only. It has been built with simplicity in mind and it can be used by anybody. All you have to do is to pick up a Linux in the list and give it a try.
Supported Linux Distros
No reboot needed
Are you sick of having to reboot your PC to try Linux ? No need with LiLi. It has a built-in virtualization feature that lets you run your Linux in Windows just out of the box !
Supports many Linux distributions
Wow ! Did you see that never-ending list ? They are almost all there : Ubuntu, Fedora, Debian, OpenSUSE, Mint, Slax, CentOS, ArchLinux, Gentoo, PCLinuxOS, Sabayon, BackTrack, Puppy Linux ...
Supported Linux Distros
Persistence
Having a Live USB is better than just using a Live CD because you can even save your datas and install softwares. This feature is called persistence (available only on selected Linux).
SmartClean & SmartDownload
SmartClean uninstalls properly any previous Live USB installs and SmartDownload lets you download any supported Linux in 2 clicks automatically selecting the best mirror to download it. SmartClean also lets you clean your USB key in one click.
And a lot more !
* Intelligent processing : LiLi works with many Linux, even if they are not officially supported
* Hidden install : LiLi hides the Linux install, your key stays clean
* File integrity : tells you if your ISO is corrupted
* Keeps your data on your USB device (format only if needed)
* Intelligent format : can format disks bigger than 32 GB
* Auto-Update : automatic updates when new Linux distributions are available
* Also works with .IMG files (experimental)
Download LinuxLive USB Creator (LiLi)


